5 dagen per week van 8:30 tot 17:30 uur

How to Replace Commercial Kitchen Range Hood Lights
A failed hood light slows kitchen work in ways that show up fast. On a grill line, cooks lose a clear read on browning. Over a fryer bank, oil color gets harder to judge. At closing, cleaning crews miss grease around seams, screws, and corners. That is why range hood light replacement in a commercial kitchen is rarely just a minor repair. In many cases, the right fix is not a new bulb but a full range hood light fixture replacement.
This guide covers how to replace a range hood light fixture step by step, with the focus kept on commercial kitchens. It also covers wiring, fit, common install mistakes, and what to check when the old light assembly has reached the end of its service life.
When the Whole Fixture Needs to Go
Not every failure calls for a bulb swap. In a busy kitchen, the fixture itself often takes the damage. Steam, grease, heat, chemicals, and repeated cleaning all wear down the housing, lens, gasket, connector, and internal LED parts.
A simple rule helps here: if the light source is built into the fixture, or the housing is damaged, replace a range hood light assembly instead of chasing small repairs.
| Sign on site | What it usually means | Best fix |
|---|---|---|
| Lens is cracked, yellowed, or loose | Heat and grease have damaged the cover | Replace the whole fixture |
| Light flickers after cleaning | Moisture or loose wiring inside the housing | Check wiring, then replace fixture if needed |
| Fixture is dark but circuit is live | LED module or internal driver has failed | Range hood LED module replacement or full fixture replacement |
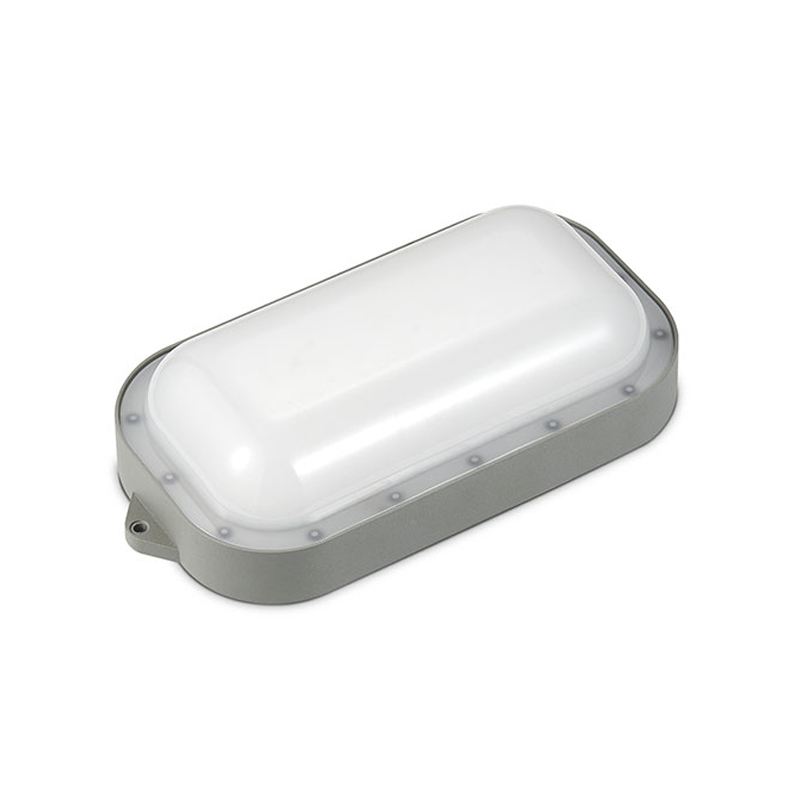
| Corrosion around screws or connector | Moisture and chemicals have entered the housing | Replace with a waterproof range hood light |
| New bulb did not solve the issue | The socket or internal parts are failing | Full range hood light fixture replacement |
Commercial hood light fixtures are commonly specified around greaseproof, waterproof, and heatproof construction, often with tempered or coated glass and compliance-focused listings for commercial cooking hoods.
Tools and Parts to Prepare
A clean, fast job starts with the right parts on the cart. Most delays come from missing small items such as connectors, screws, or the wrong mounting pattern.
For commercial range hood light replacement, prepare:
-
replacement range hood light fixture
-
screwdriver set
-
voltage tester
-
wire connectors
-
electrical tape
-
gloves
-
clean cloth
-
mounting screws
-
ladder or safe access platform
-
camera or phone for wiring reference photos
Before opening the hood, compare the new part with the old one. Check size, hole spacing, connector style, voltage, and housing depth. A compatible range hood light assembly saves time and avoids a second shutdown later.
Step-by-Step Range Hood Light Replacement
A proper hood light repair is mostly a sequence job. Skip one step, and the result is often a loose light, pinched wire, or a fixture that fails after a few shifts.
Step 1: Turn off power to the hood
The first part of how to replace a range hood light fixture is power isolation. Shut off the hood controls, disconnect the unit from its power source, and lock out the breaker if site practice calls for it.
In a commercial kitchen, that matters more than it does in light-duty spaces. Hood interiors hold heat longer, and service teams often work on ladders or from the cooking line side. Use a tester before touching any wire.
Step 2: Remove the range hood light cover or access panel
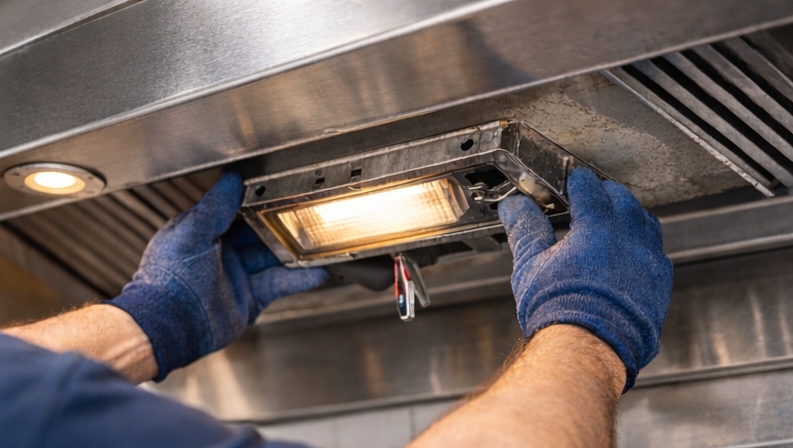
The next step is range hood light cover removal. On some hoods, the lens comes off from below. On others, the filter bank or an access panel must come off first.
If the fixture sits behind baffle filters, remove the filters and set them aside on a clean surface. Then remove the light cover, trim ring, or access plate. This is the part many search as how to remove range hood light cover, and the answer depends on the hood build: screws, spring clips, or a quarter-turn lock are the usual methods.
Do not pry hard against stainless steel. Bent edges around the opening can keep the new fixture from sitting flat.
Step 3: Remove the old light assembly
Once the opening is clear, move to how to remove range hood light assembly parts without damaging the wiring. Support the fixture with one hand and remove the mounting screws or release tabs with the other.
Pull the housing down slowly. On many commercial fixtures, the wire length is short. A quick pull can strain the connector or loosen the insulation at the entry point.
If grease has built up around the housing, wipe it before removal. That keeps debris out of the opening and makes the mounting points easier to inspect.
Step 4: Disconnect the old wiring
This is where a bulb article stops and a real fixture guide begins. How to disconnect range hood light wiring should never be treated as a casual step.
Take a clear photo first. Then disconnect the old light wires at the connector or wire nuts. Look for:
-
brittle insulation
-
blackened copper
-
loose crimp points
-
moisture inside the connector
-
oil residue at the cable entry
If any of those show up, the repair may need more than a new lamp body. When a range hood light not working issue starts with wiring damage, swapping the fixture alone may not solve it.
Step 5: Confirm the Size, Material, and Type of the New Range Hood Light
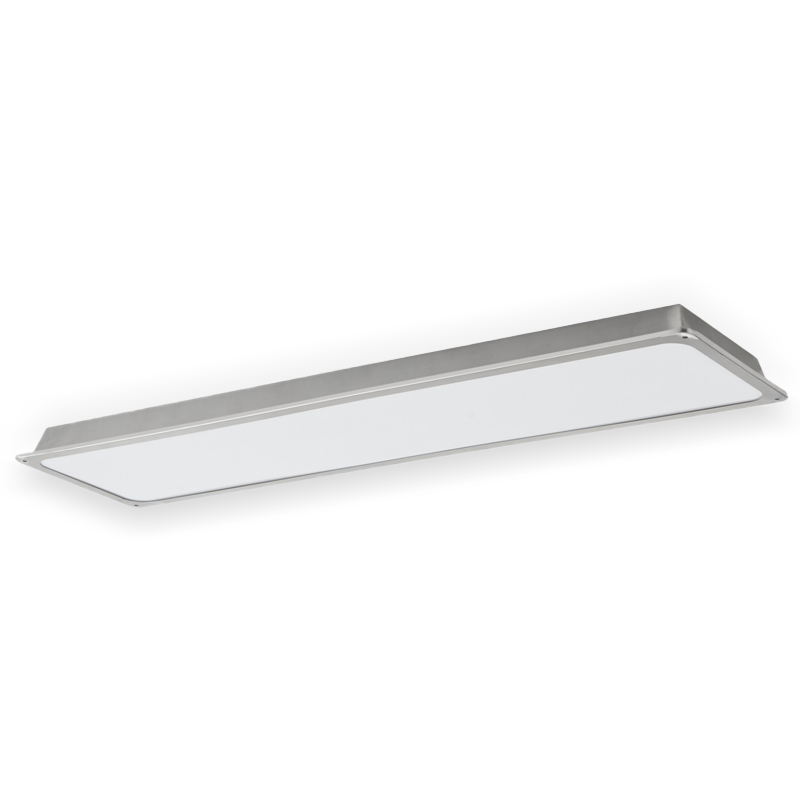
Before installation, confirm the key details of the new range hood light. In commercial kitchens, the fixture should not only fit the hood opening but also match the working conditions above the cooking area. The first thing to check is size, including the overall dimensions, housing depth, and mounting hole position. A fixture that is too large, too small, or too deep can affect installation and leave gaps around the opening.
The second point is material. In heavy-use kitchens, the housing should be suitable for heat, grease, moisture, and frequent cleaning. Stainless steel and aluminum alloy are common choices because they are more durable and easier to maintain in demanding environments. For areas exposed to steam or washdown, a waterproof range hood light is often a better option. In hot cooking lines, a heat resistant range hood light is usually more suitable.
The third point is the type of light. Buyers should confirm whether the new fixture uses an integrated LED module or another light structure already used in the hood system. It is also important to check the wiring method, voltage, and connector style before installation. Confirming these details in advance helps avoid fitting problems, wiring mismatch, and repeat replacement work.
Step 6: Install the new hood light fixture
When the fit checks out, move to how to install a new range hood light fixture.
Connect the wires according to the original layout, secure the connector, and place the cable so it cannot rub against sharp metal or get trapped under the housing. Then seat the fixture into the opening and fasten it evenly.
Do not overtighten. A warped housing or stressed lens seal can shorten the life of the new unit. On a stainless canopy hood, even a slight twist in the fixture body can leave one side open to grease vapor.
If the site is upgrading from an older assembly, this is also the point for range hood LED module replacement. Integrated LED fixtures are now common in commercial hood parts catalogs, especially for buyers looking for lower maintenance and steadier light output.
Step 7: Reassemble and test the new range hood light
Reinstall the cover, access panel, and filters. Restore power and test the new range hood light with the hood running.
Watch it for several minutes, not just a quick on-off check. A fixture that looks fine at first can still show problems once vibration, heat, and line voltage settle in.
Common Problems After Installation
Even a careful install can run into trouble. Most callbacks fall into a short list.
The new light does not turn on
If the replacement range hood light is not turning on, start with the simple checks first: live power, neutral connection, switch position, and connector seating. Many cases of range hood light not working after replacement come down to a loose wire connection or a mismatch between the new fixture and the supply.
The light flickers
Flicker usually points to poor contact, unstable voltage, moisture in the connector, or an incompatible light fixture. On older hoods, it can also point to a control problem upstream from the light.
The fixture does not sit flush
That usually means the hole pattern, housing depth, or trim diameter is off. For commercial range hood light replacement, a small fit error becomes a service issue fast because grease and vapor find every gap.
What Buyers Should Look for in Commercial Kitchens
A commercial hood light is not judged only by brightness. Service life, cleaning resistance, and install speed matter just as much.
Good buyers usually look for:
-
sealed construction for grease and moisture
-
stable light output over long shifts
-
housing materials that suit daily cleaning
-
easy mounting on prewired hoods
-
parts support for repeat orders
Many buyers also prefer aluminum alloy range hood light or stainless housing options for strength and easier upkeep in ventilation systems. That lines up with broader commercial hood fixture listings that stress metal housings, tempered lenses, and cooking-hood-ready construction.
Over Foshan Eenvoudige Technologie Co. Ltd
For buyers sourcing a range hood light supplier, Foshan Eenvoudige Technologie Co. Ltd is positioned around commercial kitchen accessories rather than general consumer lighting. The company presents range hood lights alongside grease filters, fryer baskets, adjustable legs, and other kitchen parts, with OEM and ODM support through its product center. It has a history of more than 15 years, over 20 production and assembly lines, in-house quality control, and a sales footprint across Europe, the Middle East, the Americas, and Southeast Asia. Please contact us or submit inquiries via our official website to facilitate procurement and project discussions..
Conclusie
How to replace a range hood light fixture in a commercial kitchen comes down to six practical checks: cut power, open the access point cleanly, remove the old light assembly without pulling the wiring, confirm connector and mounting fit, install the new fixture correctly, and test it under real operating conditions.
That process takes more care than a bulb change, but it solves the bigger problems that commercial kitchens actually face: damaged housings, failed LED modules, grease intrusion, and loose wiring. When the replacement part matches the hood, the line gets steady task lighting back with less downtime and fewer repeat service calls.
Veelgestelde vragen
How do you know when to replace a range hood light fixture instead of only the bulb?
If the housing is cracked, the light cover no longer seals, the connector is damaged, or the range hood light not working issue remains after a bulb swap, the better repair is a full range hood light fixture replacement.
How to remove range hood light assembly parts without damaging the hood?
Start with power off, remove filters or access panels first, support the fixture body by hand, then release the screws or spring clips slowly. That is the safest way to remove range hood light assembly parts on a commercial hood.
What should be checked before buying a replacement range hood light fixture?
Check mounting hole spacing, housing depth, connector type, voltage, lens seal, and body material. In heavy-duty sites, a waterproof range hood light or oil resistant range hood light is usually a better long-term choice.
Why is the range hood light not working after replacement?
The most common reasons are loose wire connection, wrong voltage, a poor connector fit, or an incompatible light fixture. If the new part is correct and still fails, the issue may be upstream in the hood switch or control circuit.
Is range hood LED module replacement a good upgrade for commercial kitchens?
Yes. Range hood LED module replacement often cuts maintenance, lowers heat output, and gives more stable lighting over long service hours, especially on busy cook lines.